Introduction
The Sage 300 Web SDK (SDK) is a collection of wizards, utilities, samples and documentation for developing Web Screens for the Sage 300 Application.
This week we released the Sage 300 2020 Web SDK to coincide with the release of the Sage 300 2020 Application.
It’s Available!
The SDK is available at https://github.com/SageNADev/Sage300-SDK.
Branches
As described in a previous blog and in the README file in the root of the repository, the branches contain the different versions of the SDK.
master
Contains the current version of the SDK (2020).
develop
Contains the in-progress version of the SDK (2020.1).
release-…
Contains the previous versions of the SDK (release-2017, release-2017.1, release-2017.2, release-2018, release-2018.1, release-2018.2, release-2019, release-2019.1, release-2019.2)
What’s New
Documentation
Updated documentation is available.
In the docs\upgrades folder is a document for the upgrade procedures for moving partner source from Sage 300 2019.2 to Sage 300 2020. There is a manual step in the upgrade process, so please familiarize yourself with the upgrade steps.
In the docs\development folder you will find the updated Developing New Application document that discusses and Security Resource Keys having a NONE value and the semantics for the AND and OR notation.
The docs\presentations folder has been updated and includes a PowerPoint presentation for what’s new in the SDK for 2020.
Visual Studio 2019
All wizard manifests have been revised to include Visual Studio 2019 as a target IDE.

Visual Studio 2017 and Visual Studio 2019 are now supported targets.
Version Change
The Accpac.Advantage and Accpac.Advantage.Types versions are now 6.7.0.0 and all the AccpacDotNetVersion.props files for the source and samples have been updated.

Visual Studio 2019 is now supported for web development and the .NET Framework remains at 4.7.2
Samples
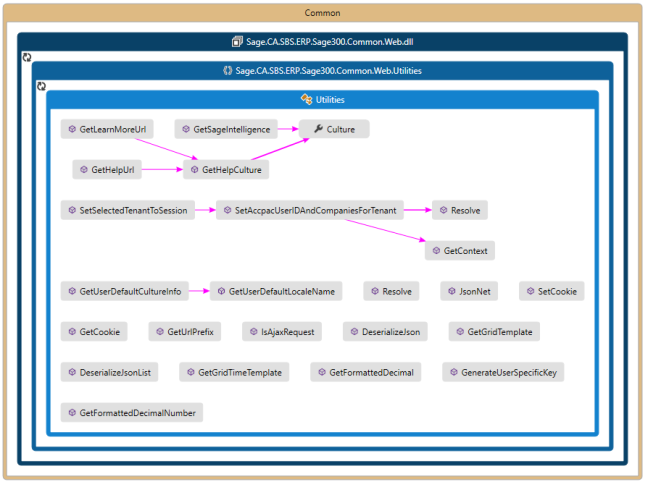
The samples have been updated with new global references and modifications to support the new multiple session behavior.
The Segment Codes sample has been re-factored to use the new grid.
Solution Wizard
References to the global files were updated and a UI update added the Metro Modern UI Framework for an updated, consistent, and a Sage branded look and feel:

The wizard is compatible with Visual Studio 2017 and Visual Studio 2019.
Customization Wizard
References to the global files were updated and a UI update added the Metro Modern UI Framework for an updated, consistent, and a Sage branded look and feel:

The Default Compatibility level was changed from 6.6A+ to 6.7A+.
The wizard is compatible with Visual Studio 2017 and Visual Studio 2019.
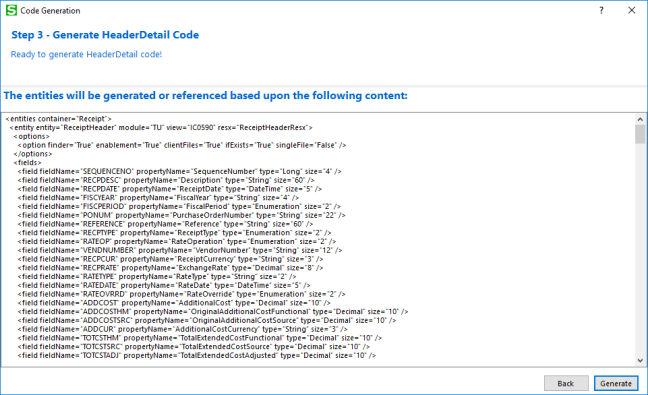
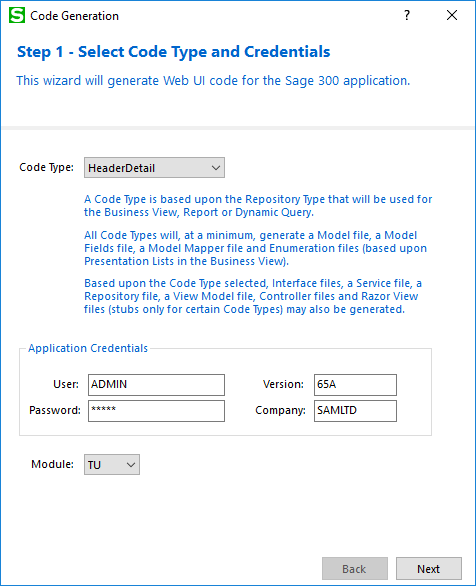
Code Generation Wizard
References to the global files were updated and a UI update added the Metro Modern UI Framework for an updated, consistent, and a Sage branded look and feel:

The wizard is compatible with Visual Studio 2017 and Visual Studio 2019.
Several items were addressed this release:
- If wizard version does not match the Sage 300 Version, the wizard simply aborted
- Added dialog for this scenario for developer to install the correct version of the wizard
- Multiple Session Changes
- With the ability in this version to run Sage 300 Web Screens in multiple tabs of the same browser, changes to support this behavior were required in the following files:
- XXAreaRegistration.cs
- Global.asax.cs
- Web.config
- PageUrl.txt
- ..Behaviour.js
- With the ability in this version to run Sage 300 Web Screens in multiple tabs of the same browser, changes to support this behavior were required in the following files:
- Added the ability to generate a grid for a Flat Code Type screen
- The Accpac View must be Flat View and be a Revision List
- #define FLAT_VIEW 1
- #define HAS_REVSIONS 2
- The Accpac View must be Flat View and be a Revision List


Upgrade Wizard
References to the global files were updated and a UI update added the Metro Modern UI Framework for an updated, consistent, and a Sage branded look and feel:

The wizard is compatible with Visual Studio 2017 and Visual Studio 2019.
With the ability in this version to run Sage 300 Web Screens in multiple tabs of the same browser, manual changes (documented in the docs/upgrade folder) to support this behavior are required in the following files:
-
-
- XXAreaRegistration.cs
- Global.asax.cs
- Web.config
- PageUrl.txt
- ..Behaviour.js
-
Inquiry Configuration Wizard
No changes this release.
MergeISVProject Executable
This utility is a post-build utility used by various wizards and the generated partner solution to pre-compile Razor Views and deploy assets to a local Sage 300 installation for developer testing.
An issue was discovered where it failed during the minification operation if a space was present in the file path. This has been addressed.
For the upcoming 2020.1 release, an enhancement will be made to the utility to copy all external files in the projects required for the asp_compile.exe to perform without issue (not all manually added external developer references are currently copied).
Partner Enhancements in the Application
The following partner requests/suggestions have been added to the application to better support developer requirements:
- Unhandled errors in the web screens are now logged in the trace.log file with the error stack
- Issues for the grid and finder released in 2019.2 have been addressed
- Mask issues in the finder have been addressed
- Exception logging in the Business Entity Session now includes the error stack
- IE11 has been removed as a supported browser for web screens
- The “NONE” security resource key in the menu XML files to properly result in the menu item always showing regardless of security permissions of the user
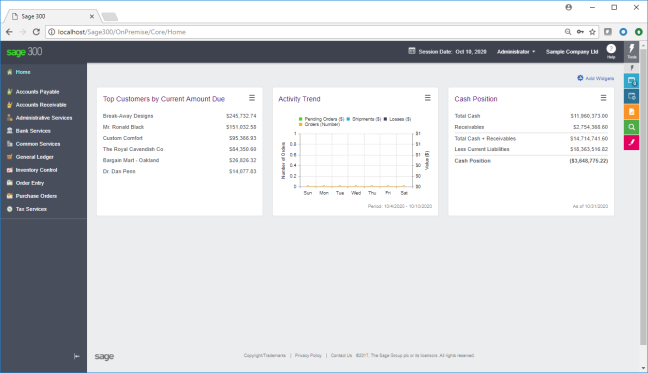
- The Instrumentation page (Core/Instrumentation) is available to display session resources used by the web screens
Desktop SDK CHM Files
Sage 300 is eliminating the delivery of CHM files starting with the 2020 release.
The Web SDK GitHub Repository is the perfect place to store these CHM and HTML help files. The Desktop SDK has been modified to point to the ‘master’ branch in the repository for these files:

The files in the help/classic folder:
- ACCPACControlsRef.chm
- AccpacCOMAPI.chm
- CViewChanges.zip (html files)
- SDK-HELP.chm
- TemplateQuickReference.zip (html files)
As with any file downloaded from the Internet, there is a possibility that the downloaded or cloned CHM and ZIP file may be blocked as the file system could detect that the files came from another computer and is protecting your computer.
If the CHM or ZIP file is blocked, simply access the properties of the file and select the “Unblock” checkbox.
Web API Sample POST Payloads
Sample POST payloads are now included in the samples/WebAPI_SamplePostPayloads folder and have sub-folders by module. These samples are great examples and learning tools for interacting with our Web API:

Multiple Sessions

Prior to 2020, the Sage 300 web screens could only be run in a single tab within a browser instance. This was because we stored a single key in the IIS Session Cache to identify the Sage 300 screen. Therefore, this mechanism made it impossible for multiple screens to be running at the same time since each screen would need to access the cache to ask, “who am i?”.
A new mechanism was required to allow Sage 300 to run in multiple tab pages with multiple contexts (user – company combinations):
- A new segment was added to the URL
- This session segment is an encoded value for the user-company combination

- Each browser is sandboxed from other browsers
- Each tab page is “partly” sandboxed from other tab pages
- Each user-company combination is unique
- Logging out will logout other tab pages in the same browser with the same user-company context, if they exist
- There will only be a single warning from the main tab page
- The Dirty flags will be ignored in the other tab pages

- All ..Behaviour.js files were modified to invoke the PageUnloadManager in the window’s “beforeunload” event in order to properly skip the dirty checks if the screen is being unloaded from another tab pages logout
LanPak Licensing for the Web Screens
Prior to 2020, there were no LanPak checks in the web screens.
LanPak checks will be performed in the web screens:
- A browser instance will be considered a sandbox. For example, if a user is logged into a web screen in Chrome as User1 – Company1, this will consume 1 license. If this same user was logged into Firefox, this would consume another license.
- The browser instance will consider 1 license to be consumed for the same user regardless of how many tab pages it is used in.
- For example, if User1 opens Company1, Company2, Company1, Company3 in 4 tab pages, this will be considered a single LanPak license.
- For example, if User1 is logged in on tab 1 and user2 is logged in on tab page 2, this will consume 2 LanPak licenses.
- There are several areas that still do not require LanPak licenses:
- Web API
- Sage 300 Web Screens invoked from CRM Integration
- Payroll Timecard Web Screen
The Current User screen in the Desktop has been enhanced to show the web screen users:

User Eviction for Web Screens is coming in 2020.1
Coming in 2020.1
As a quick preview, here’s some of the items we will be working on for the 2020.1 release:
- Web API
- Better batch logic (all or nothing) (starting with AR Invoice)
- Proper invalid error message when the payload contains an invalid item number
- New Companies List endpoint
- New CRM bi-directional endpoints as needed
- Web SDK
- Enhancement to open a view more than once in the business repository
- Enhancement to provide a programmatic interface for displaying popups
- Enhancement to the finder
- Adding an Id property
- Direct/Expanded interface without stacking parameters
- Binding a ko.computed property to a label
- Unifying the disable/disabled logic
- Performance enhancement to the RVSpy utility
- Application
- PDX Improvements
- Browser Icons, Menu Icons, Submenus, Signpost on Dashboard
- Evict User from Web Screens
- Using SignalR to free LanPaks and users from web
- Multiple Contacts
- Customer and Vendor (new MT module with backwards compatibility plus innovation)
- CRM bi-directional integration
- PDX Improvements
Summary
The Sage 300 2020 SDK is released and ready to be downloaded!
Documentation updates, the ability to run the wizards in Visual Studio 2017 or 2019, new grid implementation in the Segment Code sample, the ability to generate a grid for a Flat Code Type screen, synchronization of global files and references in the wizards, Sample POST Payloads, Desktop CHM files, and the multiple session enhancements are some of the features and enhancements in the Web SDK.
For functionality, documentation, tutorials, enhancements, etc. that are not currently in the SDK which should be there to better assist with efficient development practices and time-to-market considerations, please contact the Sage 300 Product Manager. The partners voice and feedback resound the loudest!
We continue to look forward to addressing the needs and expectations of the Sage partner community and ecosystem.
As a standard disclaimer, any topic in this article is subject to review and doesn’t represent a commitment as to when it will be available.


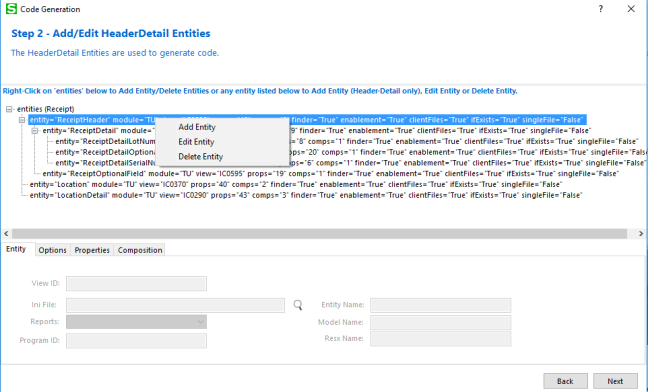 A tree control has been added to the second step for adding, editing and deleting entities. The tree control displays and allows for hierarchical entities as required by the HeaderDetail code type.
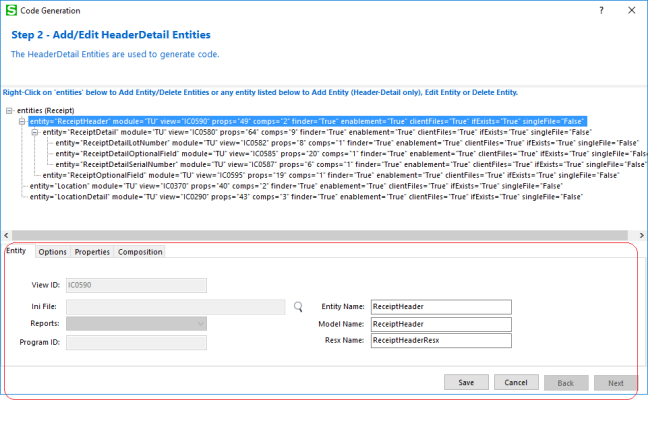 The Entity tab of the second step allows selection of the entity and editing of the properties.
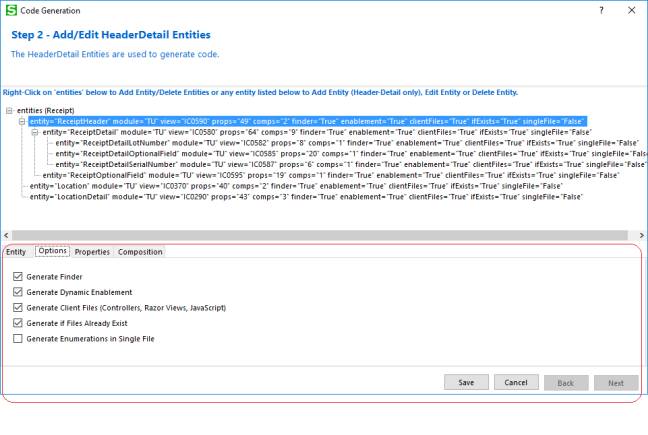 The Options tab of the second step allows selection of assorted options.
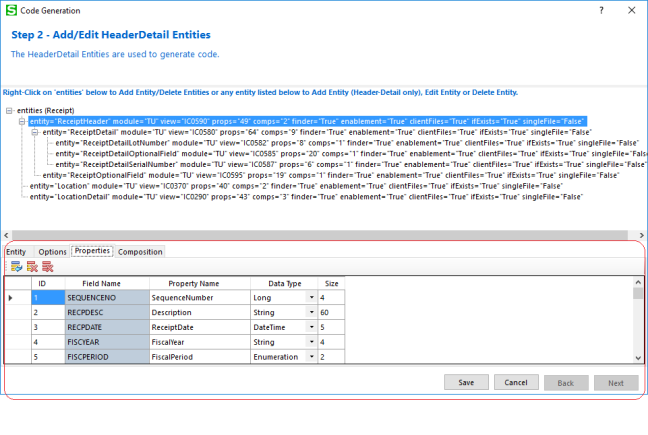 The Properties tab of the second step allows for manual entry of properties for the DynamicQuery and Report code types. It now allows for the modification of property names before the code is generated for the other code types as well.
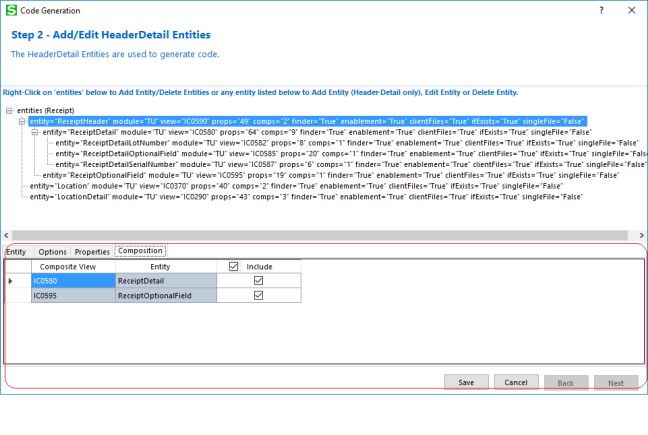 The Compositions tab of the second step is only relevant for the HeaderDetail code type and allows for the compositions of the entity to be included or not. The wizard will generate the composition logic in the CreateBusinessEntities routine of the Repository class.